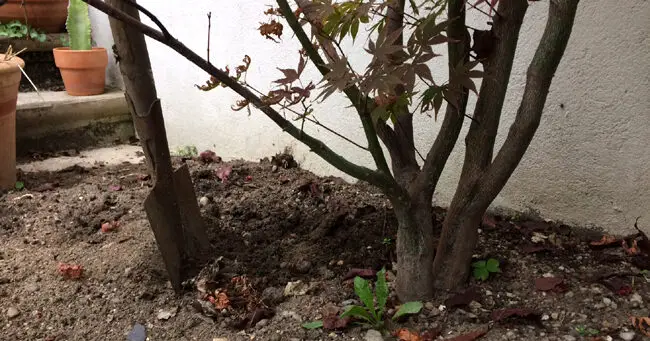
It is sometimes necessary to dig out plants for reasons such as spacing, landscaping changes or poor conditions (lack of light, humidity, etc.). This is done when plants are in a dormant period, either in spring or fall, on cloudy days.
- A few days before transplanting, water the plant copiously.
- Next to the plant to be transplanted, install either a pot of peat or jute in order to deposit the root ball. The size should be proportional to the size of the root ball (between half and two thirds of the width of the plant).
- Carefully cut the diameter required to form a good root ball.
- Slowly lift the rootball and install it in the container you have chosen.
- Transport the plant and plant according to the instructions below.
Contents
When should a plant be dug up?
Trees, Shrubs, Roses
Ideally, the transplanting of trees, shrubs and roses is done between October and March, during the vegetative rest, but outside the frost period.
Perennials
Autumn or early spring is the best time to transplant your perennials. Take advantage of a transplant to divide the larger strains.
Digging up a tree or shrub
The younger a tree is, the easier and faster it will be to transplant. The older the tree is, the more it will be necessary to anticipate the operation.
Digging up a young tree or shrub: “express” method
On young or small subjects, a professional method is not necessarily justified. However, there are certain steps that you should follow to give yourself the best chance of success:
1. Preparation
- The day before transplanting, water copiously all around the subject, to hydrate the roots and loosen the soil.
- Prepare the new planting hole, adapted to the size of the subject to be moved, i.e. at least as deep and 1.5 times wider than the root ball, and pour the equivalent of a watering can in the bottom.
- Reduce the antler of the plant to be moved by pruning moderately with a disinfected pruning shears. Remove dead wood, branches that cross each other or grow inward. If you have to cut branches with a diameter of 2 inches or more, disinfect the wound with a suitable product.
2. Transplantation
- Slice all around the tree or shrub with a very sharp spade or tickle (narrower and longer) to a depth of at least 22 inches. The aim is to cut the roots around the periphery. Work at about 22 inches from the trunk, to form a circle of 1 meter in diameter.
- If large roots are resistant, cut them cleanly with pruning shears or a delimber.
- Lever with your spade or tickle, doing little by little around the plant. The goal is to recover the roots with a maximum of soil.
- Once the plant is dug up, replant it immediately in its new location, after adding crushed horn at the bottom of the hole. Check that the collar (junction between the roots and the trunk) is flush with the soil.
- Fill with good quality potting soil mixed in with your soil and form a watering basin plumb with the outside of the root ball.
- Pack and water copiously to eliminate air pockets.
- Mulch (dry grass clippings, BRF, buckwheat hulls…).
What to do after the transplant :
- Monitor the humidity of the soil: it must not dry out in the weeks following transplanting,
- If you need to install a stake, place it on the side of the prevailing winds, before or at the same time as the plant.
Digging up well
Let us specify that the objective is to preserve an optimal quantity of roots, in order to ensure that the subject has a good chance of survival.
Your tools will be the straight shovel and the spade shovel.
Dig a trench around the shrub, with a diameter roughly corresponding to its spread. If there are roots, cut them as sharply as possible with the iron of the shovel.
Then lift the root ball with the spade. Deep roots may resist. Persevere and, if necessary, dig a little deeper.
Preparing the trip
If the shrub is of good size, moving such a heavy rootball will not be easy. Let’s see how to do it alone without compromising your back…
Take one of these blue woven polyethylene tarpaulins, very resistant, which are easily found in DIY stores.
Pass the tarp under the root ball, bring it as close as possible to the root ball, then tie it to the trunk of the shrub.
Out of the hole
Extraction of the rootball should not be done by lifting it vertically!
Take a solid wooden board and slide it under the rootball, resting on the edge of the hole.
Then simply slide the swaddled clump on the board until it comes out of the hole.
Carry the shrub in a wheelbarrow to its new destination in the garden. The tarpaulin will prevent the roots from being damaged too much.
Setting up
The hole will ideally have been dug a few weeks in advance, to prepare the ground.
Place the shrub at the bottom of the hole. Carefully remove the tarp.
Prepare a mixture of soil favourable for recovery: good planting soil, soil from the hole, compost or slow-release fertilizer. Follow our planting tips; water regularly after planting and the summer after: the shrub will take one to two years to resettle definitively.
Summary
If the plant to be transplanted has to be moved to another garden, has to travel and therefore has to wait before it can return to full soil, it is imperative to prevent the root ball and the roots from drying out.
Once out of the ground, wrap the root ball in a large burlap or thick plastic. This will limit evaporation during transport. Replant quickly.


