If you have an orchid at home, you have probably already noticed its roots overflowing from the pot. Do you know why?
It’s a strange phenomenon, specific to the orchid. It happens that the roots of this indoor flower come out of their pot. Is this a bad sign? Is my flower wilting? Of course, your orchid is fine! Its roots will be looking for something, but this is not alarming.
Contents
When should I repot an orchid with aerial roots?
Repotting is done every two years (the professionals also do it at the time of purchase to be sure to have a healthy substrate). Be careful, the first goal is not to install it in a bigger pot because orchids like to be cramped, but to change the substrate which is running out.
The diameter of the new container must be at most 1cm larger than the previous one. Beware, the orchid requires a very special substrate: it does not need potting soil but a light mixture – fine bark, sphagnum moss (moss that degrades slowly while retaining moisture) and polystyrene balls – in which air circulates and retains moisture. Be careful not to break the roots when repotting.
How do I repot an orchid with aerial roots?
The first step is to get a suitable substrate. Very few orchids can grow in standard potting soil: an orchid substrate, often made of pieces of bark, coconut fiber, sphagnum moss, perlite, clay balls, charcoal, etc., is needed. Orchid substrate can be found in any good garden center, but also at orchid shows and orchid society meetings.
Unlike many plants, it is not always necessary to repot into a larger pot, unless the pot is really full of roots, especially if it is a monopodial (single-stemmed) orchid, such as the very popular phalaenopsis. Since sympodial (multi-stemmed or pseudobulb) orchids expand horizontally as they age, yes, a larger pot may be necessary, unless you prefer to divide the plant, which is also possible.
Note that a plastic pot is preferable to a ceramic or terra cotta pot. If you use the same pot, clean it well before using it again.
Since the repotting technique varies a bit depending on the type of orchid, let’s focus here on Phalaenopsis, which make up about 95% of orchids sold as houseplants.
The day before repotting, water the orchid, which will then be easier to remove from its pot. Also soak the substrate in a bowl of water so that it absorbs some moisture. Let it drain before you begin.
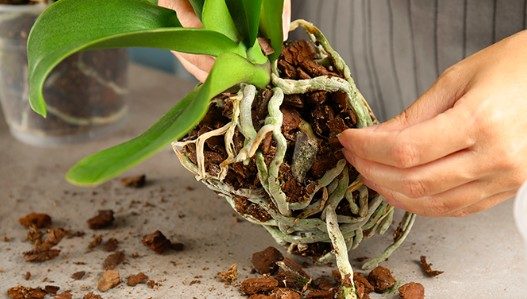
Take the orchid out of the pot, being careful not to damage the roots. For instructions on how to do this, see How to Remove a Pot Without Breaking the Roots.
With a chopstick or your fingers, knock off as much of the old soil as possible, then cut off any dead, rotten or broken roots with pruning shears (they will be brown or soft), disinfecting the shears with rubbing alcohol between cuts. Also remove any yellowed leaves and dried flower stems. You can rinse the roots with clean water to remove any dirt.
There are pots designed for orchids, sometimes ceramic with holes in the wall for better oxygenation or clear plastic, but they are not really necessary. Any growing pot with drainage holes will do.
Add a little moist substrate to the bottom of the pot (no drainage layer is needed). Center the plant in the pot at the same height as before, distributing the roots evenly in the pot, including the aerial roots (those that were growing in the air) which you can now bury. Now add substrate through the roots, pushing and tamping with your fingers so that the plant is firmly seated. Finally, spray water on the substrate.
For the first few weeks, go easy on the watering. Often a daily spray is enough. When you see signs of recovery (usually after 2 or 3 weeks), resume your usual watering. You can start fertilizing the freshly repotted orchid after about a month.
What do I do with the air roots of an orchid?
The best way to remedy this strange phenomenon is to change your pot. Especially remove the opaque pot cover, the roots of your orchid need a good light bath. This is also the occasion to bring water to it.
It is only advisable to remove the dried roots which are distinguished by a brown tint. In a simple pressure of your fingers, its roots will be detached from the healthy ones. You can do this at repotting time – which is every 2/3 years – or even before to clean the orchid.
Can I cut the aerial roots off my orchid?
If the aerial roots are sticking out of the pot, do not cut them, do not bury them, they are vital for the orchid as mentioned above. On the other hand, when repotting, it is advisable to remove the oldest and most damaged roots.
You can distinguish them because they become brown or dried out. With a simple pressure with your fingers, you can easily crush them. Cut them off as they are no longer useful to the plant, or even harmful!
Why do my orchids have so many air roots?
If you have an orchid at home, you have probably noticed the roots – imposing – of this one. It is one of the few flowers whose roots extend out of the pot. They are visible, fleshy and firm. Don’t panic, your flower is fine!
These roots that come out of the pot, in other words, the aerial roots, capture the ambient humidity and the organic particles in suspension to feed themselves. Orchid roots need to receive light just like the orchid’s leaves.
