Often used as driveway edging or fencing, arborvitaes are becoming more and more popular in gardens. If you take care of it, this shrub can bring a real added value to your outdoor space.
But of course, it can be more complicated for those who do not have a green thumb. Indeed, this variety is quite sensitive to lack of maintenance and to certain diseases.
Fortunately, there is always a solution to make up for it. Let’s take a look at the different techniques to make your arborvitae green again efficiently.
Contents
Why is my arborvitae turning yellow?
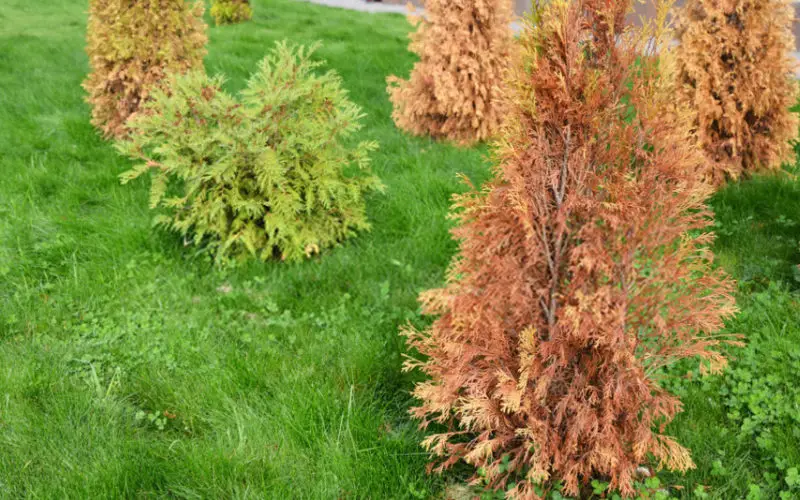
Before thinking about any solutions, you must understand why your arborvitaes are turning brown. Indeed, for each case there is a solution. Here are some ideas on the subject.
1. Disease
In most cases, arborvitaes turn brown because of a disease. There can be several kinds of diseases on this variety which we will discuss later.
Nevertheless, if you lack greenery in your hedge, you must proceed to a care quickly in order to avoid that the whole hedge becomes infected. In this case, there will be no solution.
2. Lack of nutrients
It is also possible that your arborvitaes lose their green color because of a lack of nutrients. In other words, they do not grow well enough and lack vigor. In this case, there are simple solutions that we will develop later on.
To develop well, an arborvitae will need a fertile, fresh, perfectly drained soil with very little clay. The pH should be neutral. And preferably choose a perfect exposure to the sun, while taking care to water well to avoid dehydrating the plant.
3. Lack of maintenance
But it is especially in neglected gardens that arborvitaes often turn brown. Indeed, it is a variety that requires a lot of attention: watering, pruning, aeration of the soil, etc …
If necessary, they can quickly change color and spoil the whole of your outdoor design. Depending on the condition of the site, it may or may not be possible to repair things.
What to do in case of disease on an arborvitae?
As mentioned above, there can be several diseases that attack your arborvitaes. Each one can have a different origin. But the consequences are always more or less the same on your plant.
Identify the disease on your arborvitae
1. Phytophthora cinnamoni
If you water your hedges a little too much, you can awaken these spores which are present in the soil and which are particularly devastating for arborvitaes. Symptoms start at the roots and collars before reaching the stems of the shrub and eventually leading to the brown spots you see.
A solution to avoid this disease: control the water you add to the soil of your arborvitaes. Because, once your plants are affected, there is no solution except pruning the infected parts and thus avoiding the spread of the disease.
2. Fungi
Fungi are also the sworn enemies of arborvitaes. In this case, you notice their presence by the browning of the stems of your shrub. But it mostly starts with suspicious spots on the stems, which, when they dry out after a few weeks, eventually fall off.
There can be several types of fungi that attack this type of plant. But whatever happens, to avoid them, you should always pay attention to the watering of your plants. In case yours are already infected, to cure the plant permanently and avoid a relapse, get rid of the areas that are affected.
3. Mealy bugs
Another disease that you should also watch out for is the presence of mealy bugs. You can check for them on your arborvitaes by checking the condition of the stems. If you notice drops that stick, like honey, on them, you are infected for sure.
Don’t wait until your arborvitaes are completely affected to react. Besides, treating scale insects is not complicated. You just have to take some black soap, vegetable oil and alcohol at 70° and put it on the affected areas.
4. Red spiders
Present on many types of trees and plants, red spiders are also a danger for your arborvitaes. You can recognize them mainly by the spots that are present on the foliage of your plant.
There is no real cause for the presence of red spiders on your arborvitaes. It is an insect like any other that you can avoid by watering the plants. They do not tolerate water. If you are already noticing spots on your shrubs, simply use macerate on your plants. This should cure it.
5. Burn spots
It may seem surprising to you, but the brown spots you see on your arborvitaes can also be due to sunburn on the plant. This is usually the case in summer when a heat wave rages in France.
In this case, you should think about hydrating the plant more. However, you will have to react quickly to prevent your hedges from dying completely.
6. The buprestes
Very appreciated by insects, and in particular buprestes, arborvitaes require constant attention.
And it is even more important to watch your plant against buprestes as these insects proliferate very quickly on your plants by creating holes in the stems.
If you give the buprestes time to settle inside your arborvitaes, you have no alternative to make them green again. You will have to get rid of them.
What to do in case of lack of nutrients on an arborvitae?
Are your arborvitaes brown? You have looked, but at the origin of your problem, no sign of disease or insect? It may simply be a nutrient problem. In this case, the solution is obvious: add extra nutrients to the soil.
1. Fertilizer from the professionals
One way to give your arborvitaes more vigor is to add fertilizer to your soil. Professionals can offer you some for a few dozen euros. Be careful to specify that it is a product for arborvitaes to avoid any ambiguity.
2. The disadvantages of this solution
Even if this solution would be effective to make your plant green again, it is not less imperfect for all that. Indeed, it is far from being an ecological alternative.
You can add some in full production or at the beginning of the plantation, but in any case, once your substrate will have been worked in this way, you cannot do otherwise than to add fertilizer frequently. On arborvitaes, this should be every 6 months or so.
3. Homemade compost can also do the trick
To make it more eco-friendly, you can also opt for homemade compost. It is effective in bringing more nutrients into the soil. But the concept is the same, you’ll have to come back often to make sure your hedges have everything they need.
Now, making compost at home is within everyone’s reach, thanks in part to composting devices for novices that are simple to use and promise optimal results.
4. Get rid of weeds
A possible source of nutrient deficiency on your plants can also be the weeds in the soil surrounding your arborvitaes.
They can feed on all the nutrients in the substrate. Remember to remove them frequently to protect your plants and also ensure the good appearance of your garden.
What to do in case of lack of maintenance on an arborvitae?
What if the browning of your plants was due to a lack of maintenance? This is the case in some gardens of those who do not have a green thumb or who do not have the time to take care of it.
But what are the lacks of maintenance that can really lead to the death of your hedges? And what are the necessary solutions? Here is the point.
1. Frost
You should also know that arborvitaes do not tolerate cold waves. This can lead to the browning of your plants.
But what to do then when you can’t control the weather? A straw culture is necessary. This will allow you to protect your hedges and fences simply.
And be careful not to use the branches you just cut because of the presence of certain diseases. Prefer natural straws, even if you have to add them frequently. It is more ecological.
2. Poorly controlled watering
You have certainly understood above that watering is very important and complicated to say the least on this variety. If you put too much water, you risk diseases.
If you do not put enough water, you risk burning your plants. In other words, you must master the watering and the quantity of water to bring in the ground.
And of course, be careful to water the plant through the stems as well. Don’t just wet the soil.
As with any plant, you should water your arborvitaes more in the summer than in the winter. The best indication that your plants need water is the condition of the soil. When it’s dry, it’s time to water again.
3. Pruning from time to time
Not only to ensure an aesthetic need, but also to give your plant more vigor, consider pruning your arborvitaes from time to time.
This will also allow you to cut through any infections in certain parts of the tree. Simply get rid of the dead parts of your arborvitaes.
Be careful, you will need to disinfect your pruning equipment to avoid infecting the rest of your plant before proceeding.
The pruning of arborvitaes is within the reach of all gardeners, even amateurs. At least, if you don’t have the time or are worried about doing it wrong, there are gardening companies that can offer help with this.
4. Aerate your soil
Also, be aware that arborvitaes don’t like soil that’s a little too compact. They may run out of oxygen and die. So while you’re tending your garden, remember to aerate your soil as well.
Manual hoes or electric equipment: you have a choice for the maintenance of your garden soil. In any case, know that arborvitaes are not the only ones that need perfectly aerated soil.
And remember to go deep enough, even if it means forming a mound on your plants afterward to ensure good health and good green color on your hedges all year long.
